Description
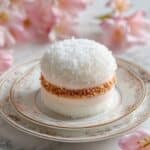
These Nostalgic Old Fashioned Pink Jelly Cakes bring back sweet memories with their soft sponge, vibrant jelly coating, and creamy whipped cream filling. Perfectly balanced with a tender crumb and a fruity, coconut-crusted exterior, this charming dessert offers a delightful combination of textures and flavors, ideal for afternoon tea or special occasions.
Ingredients
Scale
Cake Batter
- 115 grams Butter (Feel free to substitute with margarine for a dairy-free version.)
- 200 grams Caster Sugar (No substitute recommended for best results.)
- 2 teaspoons Vanilla Extract (Use vanilla paste for a more intense taste.)
- 2 large Eggs (Opt for a flax egg for a vegan alternative.)
- 150 milliliters Milk (Plant-based milk works well for a dairy-free option.)
- 200 grams Self-Raising Flour (Ensure gluten-free flour contains a binding agent.)
Jelly Coating
- 1 package Strawberry Jelly Crystals
Coating and Filling
- 50 grams Desiccated Coconut (Shred for a coarser texture if preferred.)
- 300 milliliters Whipped Cream (Use whipped coconut cream to keep it dairy-free.)
Instructions
- Preparation: Preheat your oven to 175°C (fan-forced) and grease two 12-hole patty-pan tins, ensuring they are well-coated to prevent sticking.
- Mixing Batter: In a mixing bowl, cream the butter, caster sugar, and vanilla extract until the mixture is light and fluffy. Beat in the eggs one at a time, ensuring each is fully incorporated. Then fold in the milk and sifted self-raising flour in two batches, gently combining until just mixed to avoid overworking the batter.
- Baking: Spoon the batter evenly into the prepared patty pans, filling each cavity slightly below the top edge to allow for rising. Bake in the preheated oven for 15–18 minutes or until the cakes are golden and a skewer inserted into the center comes out clean. Once baked, allow them to cool in the tins for 5 minutes before transferring onto a wire rack to cool completely.
- Preparing Jelly Syrup: Dissolve the strawberry jelly crystals in boiling water as per packet instructions. Add cold water, mix well, and then refrigerate the syrup for 1 to 2 hours until it reaches a thick, syrupy consistency suitable for dipping.
- Coating Cakes: Dip the cooled sponge cakes briefly into the chilled jelly syrup, letting the excess drip off to avoid sogginess, then roll them carefully in desiccated coconut to coat the exterior evenly for texture and flavor.
- Assembling Cakes: Spoon or pipe whipped cream onto the flat side of one jelly-coated cake, then sandwich it with another cake by pressing gently together. Repeat this process until all cakes are paired.
- Setting: Place the assembled jelly cakes into the refrigerator for about 30 minutes to allow the cream filling and jelly coating to set firmly, enhancing the texture and flavor blend before serving.
Notes
- For a dairy-free version, substitute butter with margarine and use plant-based milk and whipped coconut cream.
- Vanilla paste can be used instead of extract for a richer flavor.
- Flax eggs can replace chicken eggs to make the recipe vegan-friendly.
- Different jelly flavors can customize the color and taste of the cakes.
- Ensure gluten-free self-raising flour includes a binding agent to achieve proper texture.
- Be cautious when dipping the cakes in jelly syrup to avoid oversaturation and sogginess.
- Prep Time: 20 minutes
- Cook Time: 18 minutes
- Category: Baking
- Method: Baking
- Cuisine: British
Keywords: pink jelly cakes, nostalgic desserts, old fashioned cakes, strawberry jelly cakes, coconut coated cakes, whipped cream filling, British baking