
Refreshing Coconut Orange Glow Recipe
Introduction
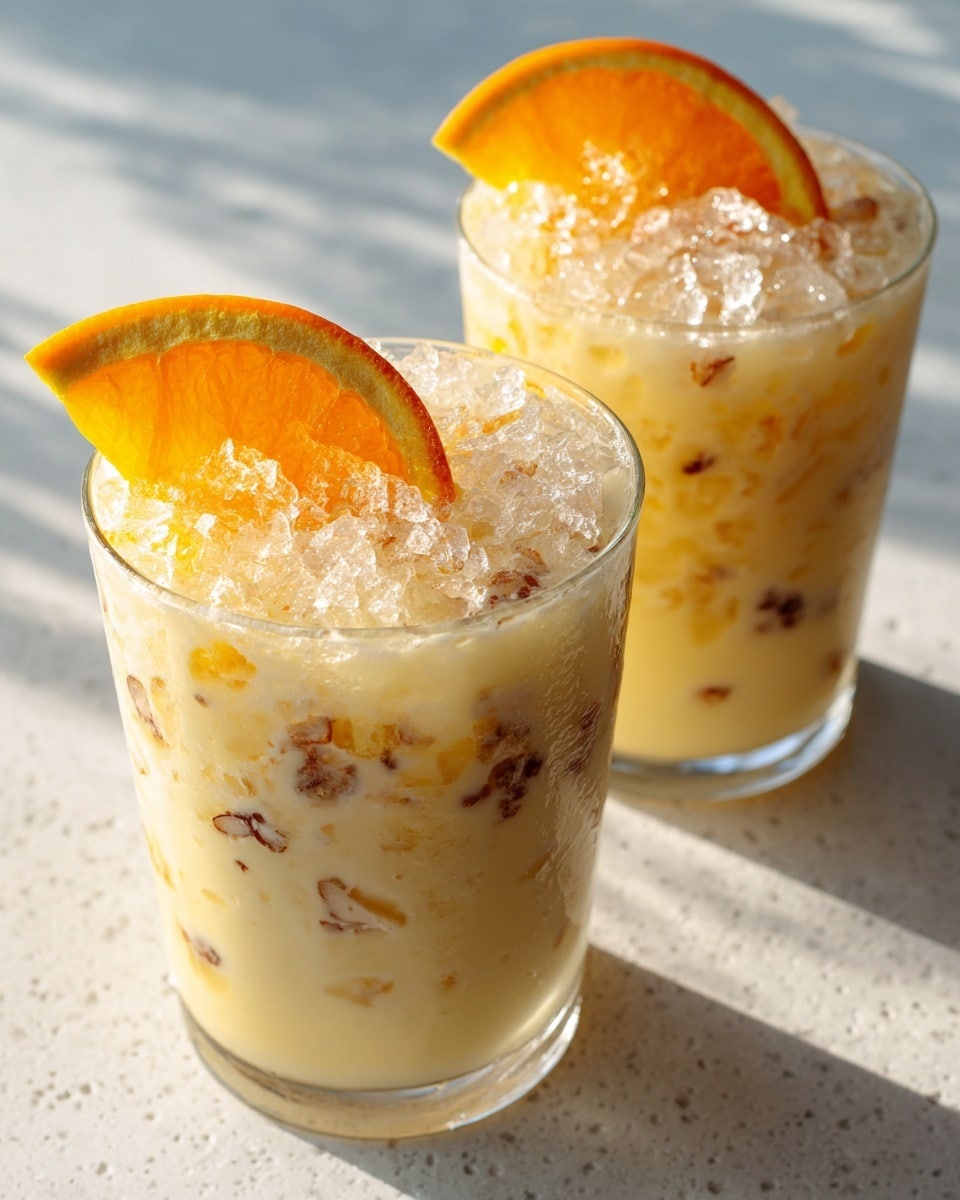
The Refreshing Coconut Orange Glow is a creamy citrus dessert that combines tropical coconut cream with bright, fresh orange flavors. This easy-to-make treat is light, silky, and perfect for a quick, refreshing finish to any meal.
Ingredients
- 1 cup unsweetened coconut cream
- 1/2 cup freshly squeezed orange juice
- 1 tablespoon orange zest
- 2 tablespoons honey or agave syrup
- 1 teaspoon vanilla extract
- Shredded coconut (optional, for garnish)
- Pinch of salt
Instructions
- Step 1: Zest the orange using a microplane or fine grater and set the zest aside.
- Step 2: Juice the orange and measure out 1/2 cup (120 ml) of fresh orange juice.
- Step 3: In a blender or food processor, combine the coconut cream, orange juice, honey or agave syrup, vanilla extract, and a pinch of salt.
- Step 4: Blend the mixture on high until it’s silky smooth, about 2-3 minutes. Scrape down the sides of the blender halfway through to ensure even mixing.
- Step 5: Taste the mixture and adjust the sweetness if needed by adding more honey or orange juice.
- Step 6: Pour the mixture into serving glasses or bowls and chill in the refrigerator for at least 1 hour.
- Step 7: Before serving, garnish with shredded coconut and a sprinkle of orange zest.
Tips & Variations
- For a vegan-friendly version, use agave syrup instead of honey.
- Adding a few drops of lime juice can enhance the citrus brightness.
- Swap fresh orange juice for mandarin or tangerine juice for a sweeter twist.
- To make it more indulgent, top with toasted coconut flakes for added texture.
Storage
Store the dessert covered in the refrigerator for up to 2 days. Stir gently before serving if liquid separates. This dessert is best enjoyed chilled and does not reheat well.
How to Serve

Serve this delicious recipe with your favorite sides.
FAQs
Can I use canned coconut milk instead of coconut cream?
Coconut cream is thicker and richer, which gives this dessert its creamy texture. If using canned coconut milk, choose the thickest part and chill it beforehand, but the consistency may be slightly lighter.
How do I make this dessert less sweet?
You can reduce or omit the honey or agave syrup and rely on the natural sweetness of fresh orange juice. Adjust the sweetness gradually to your taste.
Print
Refreshing Coconut Orange Glow Recipe
- Total Time: 1 hour 10 minutes
- Yield: 4 servings 1x
- Diet: Vegan
Description
A light and refreshing creamy citrus dessert that combines the tropical richness of coconut cream with the bright, zesty flavors of fresh orange juice and zest. Perfect for a quick, no-bake treat that’s both smooth and naturally sweetened with honey or agave syrup.
Ingredients
Main Ingredients
- 1 cup unsweetened coconut cream
- 1/2 cup freshly squeezed orange juice
- 1 tablespoon orange zest
- 2 tablespoons honey or agave syrup
- 1 teaspoon vanilla extract
- Pinch of salt
Optional Garnish
- Shredded coconut (optional, for garnish)
Instructions
- Prepare the Orange Zest: Zest the orange using a microplane or fine grater to capture the vibrant outer peel, then set it aside for use both in the mixture and as garnish.
- Juice the Orange: Slice and juice the orange, measuring out 1/2 cup (120 ml) of fresh orange juice to ensure the perfect citrus balance in the dessert.
- Combine Ingredients: In a blender or food processor, add the coconut cream, fresh orange juice, honey or agave syrup, vanilla extract, and a pinch of salt to create a flavorful and smooth base.
- Blend Smoothly: Blend the ingredients on high speed for 2 to 3 minutes, pausing to scrape down the sides halfway through to achieve an even, silky texture without any lumps.
- Adjust Sweetness: Taste the mixture and modify the sweetness by adding extra honey or orange juice to suit your preference, blending briefly again if added.
- Chill the Dessert: Pour the creamy mixture into serving glasses or bowls, then refrigerate for at least 1 hour to allow the flavors to meld and the dessert to chill properly.
- Garnish and Serve: Just before serving, sprinkle the top with shredded coconut and a little freshly grated orange zest to enhance the presentation and add texture.
Notes
- For a vegan version, use agave syrup instead of honey.
- Adjust the thickness by adding more coconut cream or orange juice as desired.
- Use freshly squeezed orange juice and zest for the best flavor; bottled juice will not provide the same brightness.
- This dessert is best served chilled and consumed within 2 days for optimal freshness.
- Add a few ice cubes to the blender if you prefer a colder, slightly thicker texture immediately.
- Prep Time: 10 minutes
- Cook Time: 0 minutes
- Category: Dessert
- Method: Blending
- Cuisine: International
Keywords: coconut cream dessert, orange dessert, creamy citrus dessert, no bake dessert, vegan dessert, healthy dessert


