Description
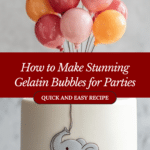
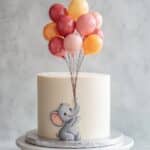
Create beautiful, edible gelatin bubbles that make a stunning decoration for desserts and special occasions. This recipe guides you through making delicate, colorful gelatin spheres by dipping lightly greased small balloons into a warm gelatin mixture. After coating and drying, the balloons are carefully removed, leaving behind hollow, shiny gelatin bubbles perfect for adding an elegant touch to your culinary creations.
Ingredients
Scale
Gelatin Mixture
- 6 Tbsp unflavored gelatin (56g)
- 3/4 cup cold water (180g)
- Gel food coloring (few drops)
- Luster dust (optional, for shimmer)
Preparation Supplies
- 3 Tbsp shortening
- 30 small balloons
- Paper towels (for wiping shortening)
- Paper straws (optional, for handling balloons)
Instructions
- Prepare the Balloons: Partially inflate 30 small balloons, tying a knot high up the neck to create a somewhat spherical shape. Optionally, tie each balloon to a paper straw to make handling easier during dipping.
- Grease the Balloons: Cover each balloon with a thin, even layer of shortening until shiny without white streaks. Use paper towels to remove excess shortening. This step helps the gelatin coat release easily once dried.
- Bloom the Gelatin: In a small heat-proof bowl, combine 3/4 cup cold water with 6 Tbsp unflavored gelatin (maintain a 2:1 water to gelatin ratio). Gently swirl to hydrate the gelatin and let it sit for a few minutes to fully bloom (absorb water) and thicken.
- Melt the Gelatin: Warm the gelatin mixture in the microwave for about 20 seconds until the gelatin becomes warm and fluid but not hot to the touch. Stir to dissolve completely.
- Add Color and Shine: Stir in a few drops of gel food coloring and optional luster dust to the warm gelatin. If not fully melted, heat in 10-second intervals, stirring between, until smooth and clear. Skim off any foam or bubbles from the surface to avoid cloudy finishes on your bubbles.
- Dip Balloons – First Coat: Gently dip each greased balloon into the gelatin, rolling to coat most of the balloon surface with a thin even layer. Shake off excess. If using straws, place balloons upright in a heavy glass; otherwise, rest them tie-side down on a cooling rack to dry.
- Maintain Gelatin Consistency: If the gelatin thickens while dipping, reheat for 10 seconds in the microwave to restore fluidity before continuing.
- Dip Balloons – Second Coat: Once the first coat is dry, dip each balloon again to add a second coat, improving strength and color vibrancy.
- Dry the Bubbles: Let balloons dry undisturbed for about 12 hours or overnight until fully hardened. To speed drying, let bubbles rest 30 minutes then use a small fan at low speed for roughly 4 hours. Be careful to avoid blowing them away.
- Remove Balloons: Puncture the exposed balloon gently with scissors and allow it to deflate. Carefully peel away the balloon from inside the hardened gelatin bubble.
- Fix Imperfections: If bubbles collapse or wrinkle slightly, gently push them back into shape; they are quite sturdy despite delicate appearance.
- Trim Edges and Use: Use sharp scissors to trim any jagged edges at the bubble base. Your gelatin bubbles are now ready to be used as decorative edible accents on desserts or displays.
Notes
- Ensure balloons are greased evenly to allow easy removal after drying.
- Keep gelatin warm and fluid during dipping stages for smooth coating.
- Avoid foam on gelatin surface to prevent cloudy bubbles.
- Dry bubbles slowly at room temperature or use a low-speed fan carefully to speed drying without displacing them.
- Handle bubbles gently after drying as they are delicate but resilient.
- Use luster dust sparingly to add optional shimmer and color highlights.
- Prep Time: 30 minutes
- Cook Time: 4 hours (drying time)
- Category: Dessert Decoration
- Method: No-Cook
- Cuisine: American
Keywords: gelatin bubbles, edible bubbles, dessert decoration, gelatin recipe, party decoration, edible spheres