
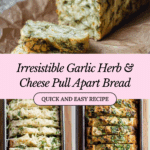
Garlic Herb and Cheese Pull Apart Bread Recipe
Introduction
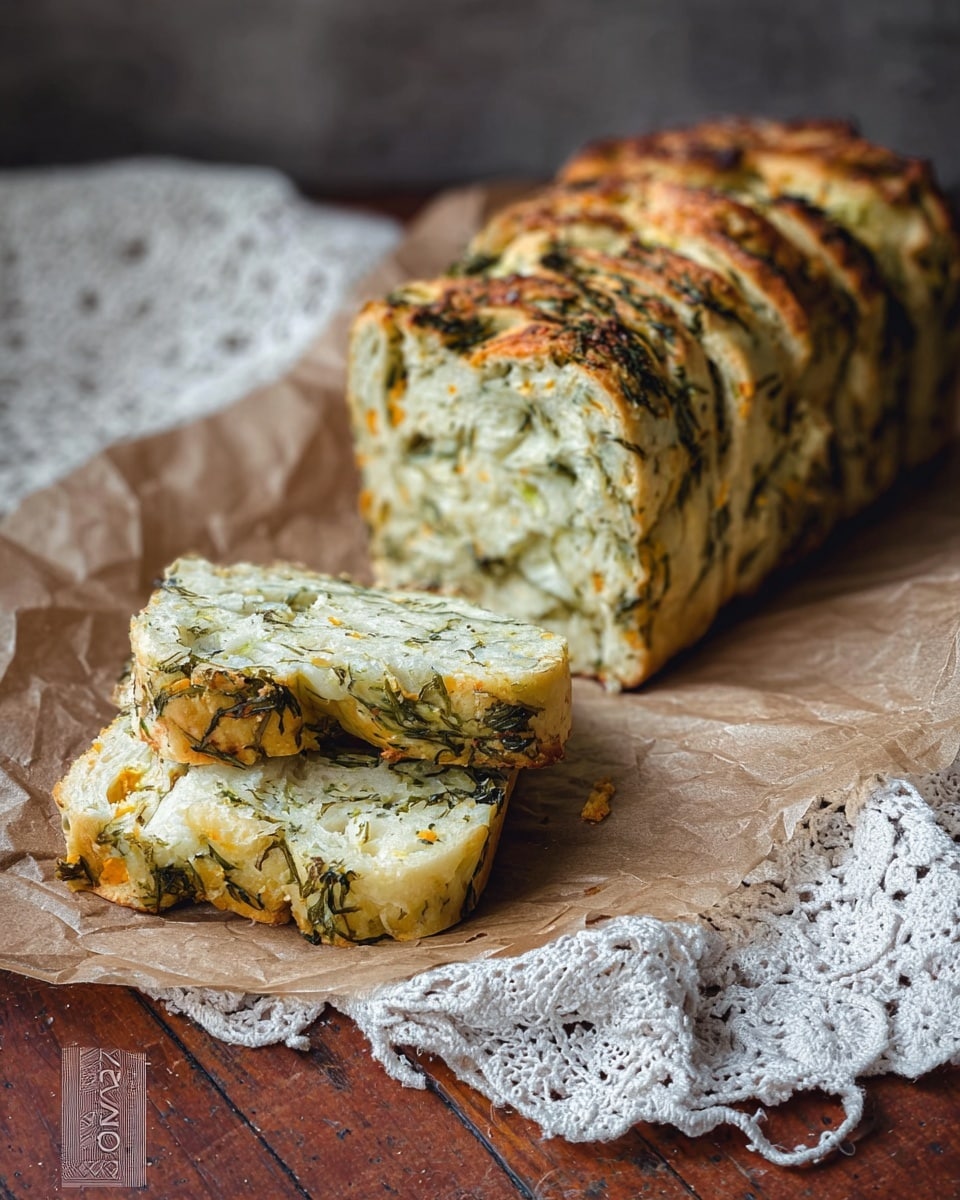
This Garlic Herb and Cheese Pull Apart Bread is a deliciously fluffy, flavorful treat perfect for sharing. Soft bread layered with garlic, fresh herbs, and a blend of cheeses makes every pull-apart piece a taste sensation. It’s ideal for snacks, sides, or even a party centerpiece.

Ingredients
- 500g plain flour
- 1/2 tablespoon dried yeast granules
- 1/2 tablespoon salt
- 1/2 tablespoon sugar
- 1/2 teaspoon bread improver
- 325ml water at room temperature
- 1/2 tablespoon olive oil
- 1 garlic clove, crushed
- 1/3 cup chopped continental parsley
- 1/3 cup chopped basil
- 1/4 cup chopped rosemary leaves
- 1 tablespoon butter
- 200g grated Philly and Tasty cheese
Instructions
- Step 1: In a large bowl, mix together the flour, yeast, salt, sugar, and bread improver. Add half of the water and begin mixing, slowly adding the rest of the water until the dough forms a ball. Transfer the dough to a floured bench top.
- Step 2: Add the olive oil to the dough and knead it in thoroughly. If the dough is too sticky, sprinkle in a little extra flour. Continue kneading until the dough is smooth and elastic, which is essential for a good rise and fluffy texture.
- Step 3: Place the dough back into the bowl, cover it with cling wrap and a tea towel, and keep it warm until it doubles in size. This may take 1 to 1.5 hours depending on your environment.
- Step 4: Once risen, punch the dough down and divide it in half. Roll each half into rectangles about 50cm by 25cm, then trim the edges for straight sides.
- Step 5: Spread half the butter on each rectangle’s surface. Sprinkle evenly with crushed garlic, the mixed herbs (parsley, basil, rosemary), and the grated cheeses.
- Step 6: Using a sharp knife, cut each rectangle into strips the height of your loaf tins. Stack these strips and then cut the stacks into squares that match the width of your tins.
- Step 7: Grease or line your loaf tins. Stack the dough squares on top of each other, turn the stack sideways, and place it into the tins. Cover loosely with cling wrap and let the dough proof for another 30 minutes. You may freeze the loafs at this stage if desired.
- Step 8: Preheat your oven to 190° Celsius. Remove the cling wrap and bake the bread for 55 minutes or until the tops are golden brown.
- Step 9: Once baked, let the bread rest for 10 minutes before removing it from the tins. Serve warm and enjoy pulling apart the cheesy, herby bread.
Tips & Variations
- Use fresh herbs for the best flavor, but dried herbs can be substituted if needed—reduce quantity by about half.
- Try adding a pinch of chili flakes for a subtle spicy kick.
- If you prefer, substitute the Philly and Tasty cheeses with mozzarella and cheddar for a different cheesy combination.
- Make sure to knead the dough well to develop gluten, which ensures a light, airy bread.
Storage
Store the bread in an airtight container at room temperature for up to 2 days. To keep it longer, wrap tightly and freeze for up to 1 month. Reheat slices in a warm oven or toaster to restore softness and melting cheese deliciousness.
How to Serve
Serve this delicious recipe with your favorite sides.
FAQs
Can I prepare the dough ahead of time?
Yes, you can prepare the dough and keep it refrigerated overnight after the first rise. Allow it to come to room temperature and rise again before assembling and baking.
What if I don’t have bread improver?
Bread improver helps with texture and rise but is not essential. You can omit it and still get good results, though the bread may be slightly less fluffy.
Print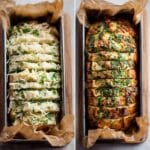
Garlic Herb and Cheese Pull Apart Bread Recipe
- Total Time: 2 hours 55 minutes
- Yield: 2 loaves (standard loaf tins) 1x
Description
This Garlic Herb and Cheese Pull Apart Bread is a savory, aromatic loaf featuring a fluffy yeast dough layered with garlic, fresh herbs, and melted cheese. The stacked strips of dough bake into a pull-apart masterpiece, perfect for sharing as a flavorful side or snack.
Ingredients
Dough Ingredients
- 500g plain flour
- 1/2 tablespoon dried yeast granules
- 1/2 tablespoon salt
- 1/2 tablespoon sugar
- 1/2 teaspoon bread improver
- 325ml water at room temperature
- 1/2 tablespoon olive oil
Herb and Cheese Filling
- 1 garlic clove, crushed
- 1/3 cup chopped continental parsley
- 1/3 cup chopped basil
- 1/4 cup chopped rosemary leaves
- 1 tablespoon butter, melted or softened
- 200g grated Philly and Tasty cheese
Instructions
- Prepare the Dough: In a large bowl, mix together flour, dried yeast, salt, sugar, and bread improver. Gradually add half the water to the dry ingredients while mixing, then slowly incorporate the rest of the water until the dough begins to come together into a ball.
- Knead the Dough: Transfer the dough to a floured surface and knead in the olive oil. If the dough is sticky, add a bit more flour. Continue kneading until the dough becomes smooth, elastic, and well combined.
- First Proof: Place the dough ball back into the bowl and cover with cling wrap and a tea towel. Leave in a warm place for 1 to 1.5 hours or until the dough has doubled in size.
- Shape the Dough: Knock back the risen dough to release air. Divide dough into two halves. Roll each into a rectangle approximately 50cm by 25cm, trimming edges to make straight sides.
- Add the Filling: Spread butter evenly over both rectangles. Sprinkle crushed garlic, the herb mixture (parsley, basil, rosemary), and grated cheeses evenly over each.
- Slice the Dough: Using a very sharp knife, cut each rectangle into strips matching the height of your loaf tins. Stack strips vertically and then cut the stacked strips into squares the width of your loaf tins.
- Assemble in Loaf Tins: Grease or line your loaf tins. Stack the dough squares on top of each other, turn the stack on its side, and place into the tins. It’s fine if the dough doesn’t fill the tins to the edges as it will rise again.
- Second Proof: Cover the tins with cling wrap and allow the dough to rest for an additional 30 minutes. At this stage, you can optionally freeze the unbaked loaves for later use.
- Bake: Preheat oven to 190°C (374°F). Remove cling wrap and bake the loaves for 55 minutes or until golden on top.
- Cool and Serve: Remove loaves from oven and cool in tins for 10 minutes before removing. Serve warm and enjoy pulling apart the cheesy, garlicky layers.
Notes
- Ensure to knead the dough thoroughly for a light and fluffy texture.
- Dough rising times may vary depending on room temperature.
- Freezing the assembled but unbaked loaf is a convenient option for make-ahead baking.
- Use a sharp knife to achieve clean cuts in the dough for stacking.
- Serve warm to enjoy the full melty cheese experience.
- Prep Time: 30 minutes
- Cook Time: 55 minutes
- Category: Bread
- Method: Baking
- Cuisine: Western
Keywords: pull apart bread, garlic bread, herb bread, cheesy bread, savory bread, homemade bread
